If you’ve been anywhere near home decor TikTok or Pinterest lately, you’ve probably seen the IKEA BEKVÄM spice rack popping up everywhere (for good reason). At under $10 a piece, it’s one of the most versatile little shelves IKEA sells. But most tutorials stop at simply mounting them to the wall straight out of the box, whereas I wanted to come up with my own IKEA spice rack hack for small kitchens that I could pass along to others to use as well.

When I moved into my last rental, my kitchen had zero dedicated spice storage and cabinet space was tight. Rather than reducing my collection and cramming it into a cabinet, I found some empty wall space and turned it into a fully functional, beautiful storage wall for under $80 total. Here’s exactly how I did it.
This post contains affiliate links. If you choose to purchase through them, I may earn a small commission at no extra cost to you. Thank you so much for supporting Stud & Sage, it truly helps me continue sharing DIY projects like this.
What You’ll Need
- 6 x IKEA BEKVÄM Spice Racks (or however many you need for your wall space)
- IKEA HULTARP black railing (I used one for one of the shelf pairs)
- IKEA HULTARP railing hooks
- A small container for the railing
- Wood glue
- Sander + sandpaper
- Wood stain (I used Early American b/c I’m obsessed with this color)
- Drill
- Wall anchors + screws
- Level
Total cost: Around $80 if you’re going with 6 racks and the railing with hooks. If you don’t already have stain, sandpaper, and glue on hand, you’ll need to invest a little more.
Why the BEKVÄM Works So Well for This
The IKEA BEKVÄM is made from solid aspen wood, which means it sands beautifully and takes stain really well. Straight off the shelf it looks fine, but once you stain it and customize the size, it looks like something you’d pay three times the price for at a boutique home store. That’s exactly the Stud & Sage approach- make it look expensive without spending like it is.
Step 1: Sand Everything Down
Before you do anything else, give every rack a good sand. The raw aspen wood has a slightly rough, unfinished feel straight out of the box, and sanding it down first means your stain will go on smoothly and evenly. Start with a medium grit (around 120) and finish with 220 for a silky smooth surface. Don’t skip this step because it’s what takes these from “IKEA shelf” to “custom built-in” territory.

Step 2: Stain to Your Heart’s Content
I used Early American stain, which gives a warm, rich wood tone that feels cozy and elevated without being too dark. Apply with a brush or a rag, working with the grain, and wipe away any excess as you go.
This is where you’ll need a little patience because you need to let the stain dry fully before installation. I did this over a weekend, letting everything dry overnight. The color transformation is stunning!

Other stain colors that would look gorgeous for this project:
- Jacobean — deeper and moodier, great for dark kitchens
- Golden Oak — lighter and more natural, perfect for boho or cottage-style spaces
- Classic Gray — for a modern, Scandinavian feel
Step 3: Glue Two Racks Together
This is the step that makes the biggest visual difference. Instead of mounting individual 16-inch racks, I glued two racks side by side to create one long, elongated shelf. Apply wood glue along the joining edge, press them firmly together, and let them dry completely before moving on. The result looks so much more intentional and custom than a single rack. It almost looks built-in once it’s on the wall.
I made 3 rows of these elongated pairs, so 6 racks total.

Step 4: Add the Railing for Extra Storage
On one of my elongated shelf pairs, I installed a small black railing along the bottom edge. This adds a whole extra layer of functionality. I use it with hooks to hang small items and decor, which frees up even more shelf space. It’s a small addition that makes a big impact both visually and practically.
The railing was $8 and the hooks were $3, so for $11 extra you essentially get bonus storage on one of your shelves. 100% worth it.

Step 5: Mount to the Wall
Now for the installation! Here’s how I hung mine:
- Plan your layout first: I did 3 rows of 2 elongated shelves. Lay everything out on the floor first to visualize spacing before you start drilling
- Mark your spots: Use a pencil to lightly mark where each shelf will go on the wall
- Use a level: Non-negotiable. Even a slightly crooked shelf will drive you crazy every single time you walk into the kitchen
- Install wall anchors: Drill your anchors into the wall at each marked point. If you can find a stud, great. If not, good anchors will hold these shelves just fine since they’re relatively lightweight
- Install: Drive your screws into the anchors (leave some space for your shelves to sit) and hang your shelves
- Do a tug test: Give each shelf a firm tug before loading it up, just to make sure everything is secure

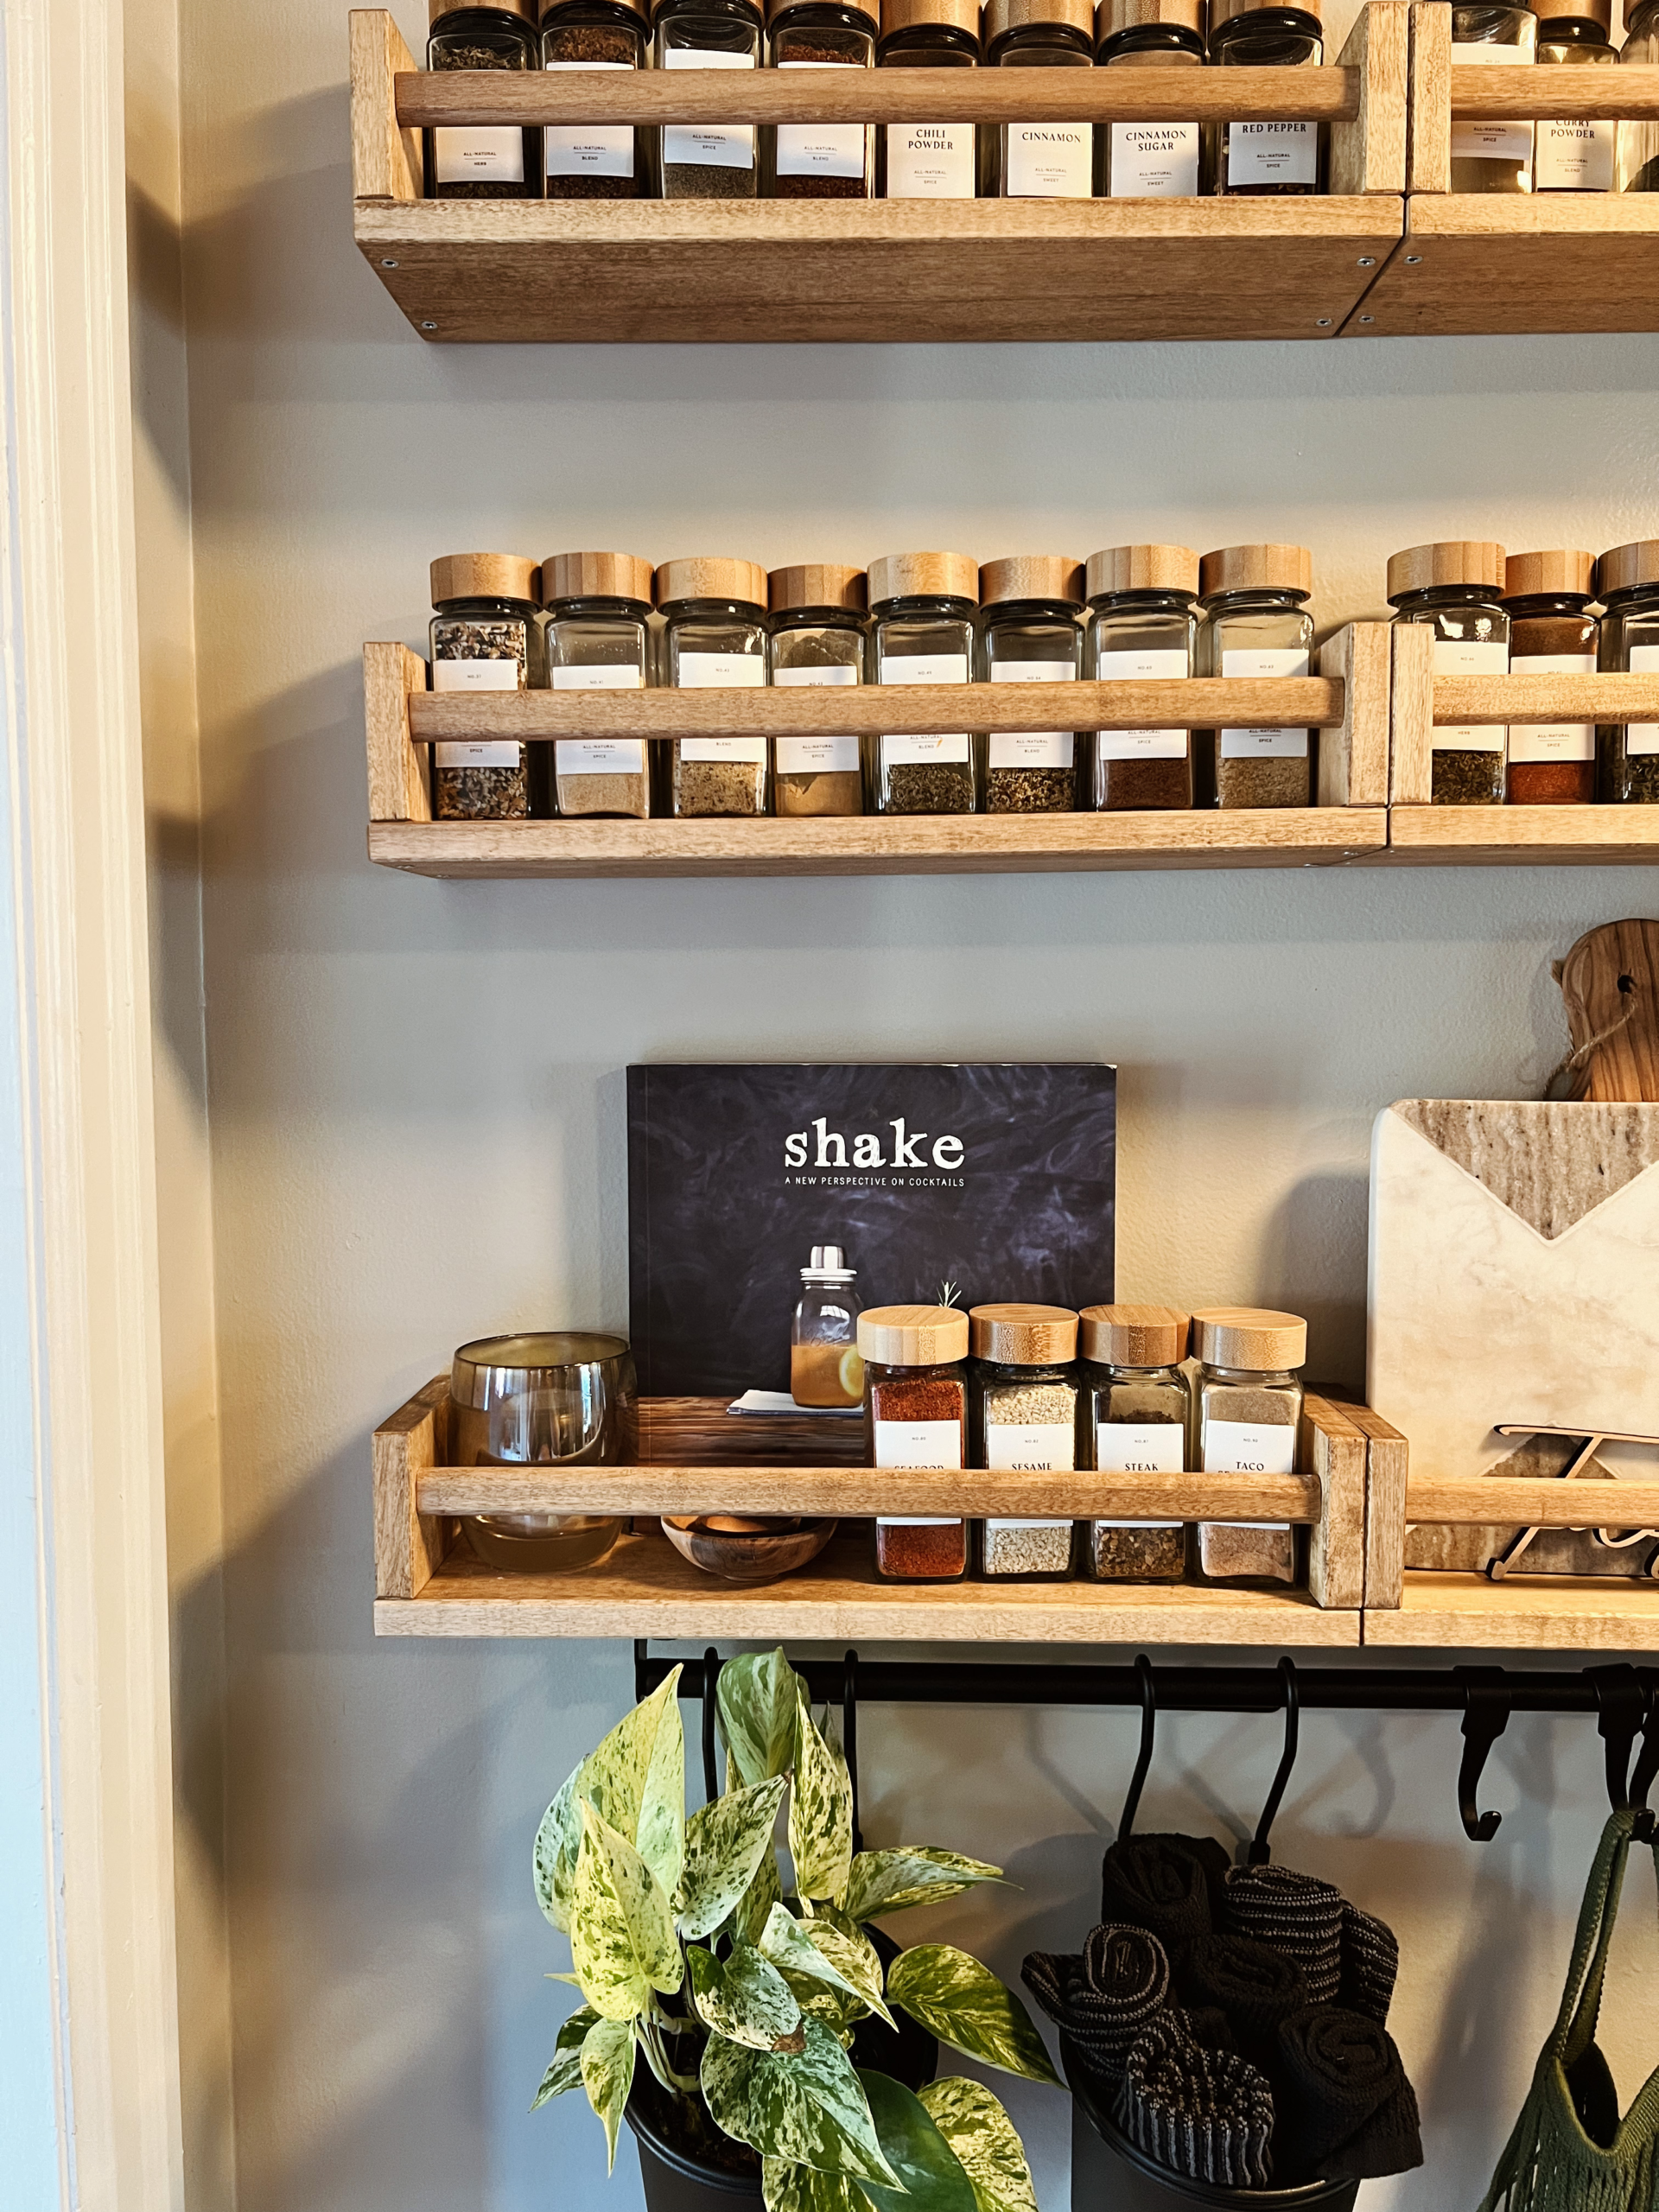
Step 6: Style It Up
This is the fun part! I styled my shelves with:
- Spices: the whole reason this project started, and now they’re so easy to grab while cooking. Here’s the link to the set I have.
- Cutting boards: these lean beautifully against the back rail and look great displayed this way. You can’t go wrong with a mini marble board!
- Books: a small cookbook or two adds warmth and personality. I’m a sucker for cocktail books.
- A small container or produce bags on the railing: for odds and ends like twist ties, bag clips, small utensils, and fresh produce. I like to use these mesh produce bags.
The mix of functional and decorative items is what makes it look intentional rather than just utilitarian.

The Final Result
What started as a storage problem turned into one of the most-commented-on features of my kitchen. Every single person who comes over asks about it, and when I tell them the whole thing cost under $80 and was done in a weekend, no one believes me!
That’s the magic of taking a humble little IKEA shelf, putting in a little extra effort with the stain and customization, and giving it a thoughtful layout. It stops looking like a hack and starts looking like a design decision.

Cost Breakdown
| Item | Cost |
|---|---|
| 6 x IKEA BEKVÄM Spice Racks | $60 |
| Black railing | $8 |
| Railing hooks | $3 |
| Small container | $9 |
| Stain, sandpaper, glue | Already on hand |
| Total | $80 |
Tips Before You Start
- Stain all your pieces before assembly if you want truly even coverage on every surface
- Measure your wall space first so you know exactly how many rows and pairs you need
- The railing addition is optional but highly recommended because it adds so much function for very little cost

I’d love to see your version of this project! Tag me on Instagram @tarahillhome my Reel on this one has been so fun to share and I can’t wait to see yours. Drop any questions in the comments below and I’m happy to help!
Happy building! 🪵
Interested in more Ikea projects? Check these out:
– How to Install the Viral IKEA Ceiling Track Curtains

Leave a Reply