Custom matchbox party favors are one of the most thoughtful and memorable things you can send guests home with, and making them yourself costs a fraction of what you’d pay to have them made for you. When I was planning my housewarming party, I knew I wanted something small, personal, and unforgettable rather than a generic candle or a bag of candy. These custom matchboxes were exactly that. I made 50 of them for just $60 and they were honestly the highlight of the whole party!
Here’s exactly how I made them, what I’d do differently, and everything you need to recreate this for your own party.

This post contains affiliate links. If you choose to purchase through them, I may earn a small commission at no extra cost to you. Thank you so much for supporting Stud & Sage, it truly helps me continue sharing DIY projects like this.
What You’ll Need to Make Custom Matchbox Party Favors
- Empty matchboxes— ordered from Amazon
- Kitchen matches from your grocery store (or better yet, read my tip below before you order!)
- Scissors — you’ll need sharp ones if you go the matchbox route
- Canva (free) — for designing your stickers
- MakeStickers.com — for ordering custom printed stickers
Total cost for 50 matchboxes: approximately $60

My #1 Tip Before You Start: Use Matchbooks Instead
Before I walk you through exactly what I did, I want to save you some time and money with the lesson I learned the hard way.
If you can, order matchbooks instead of matchboxes.
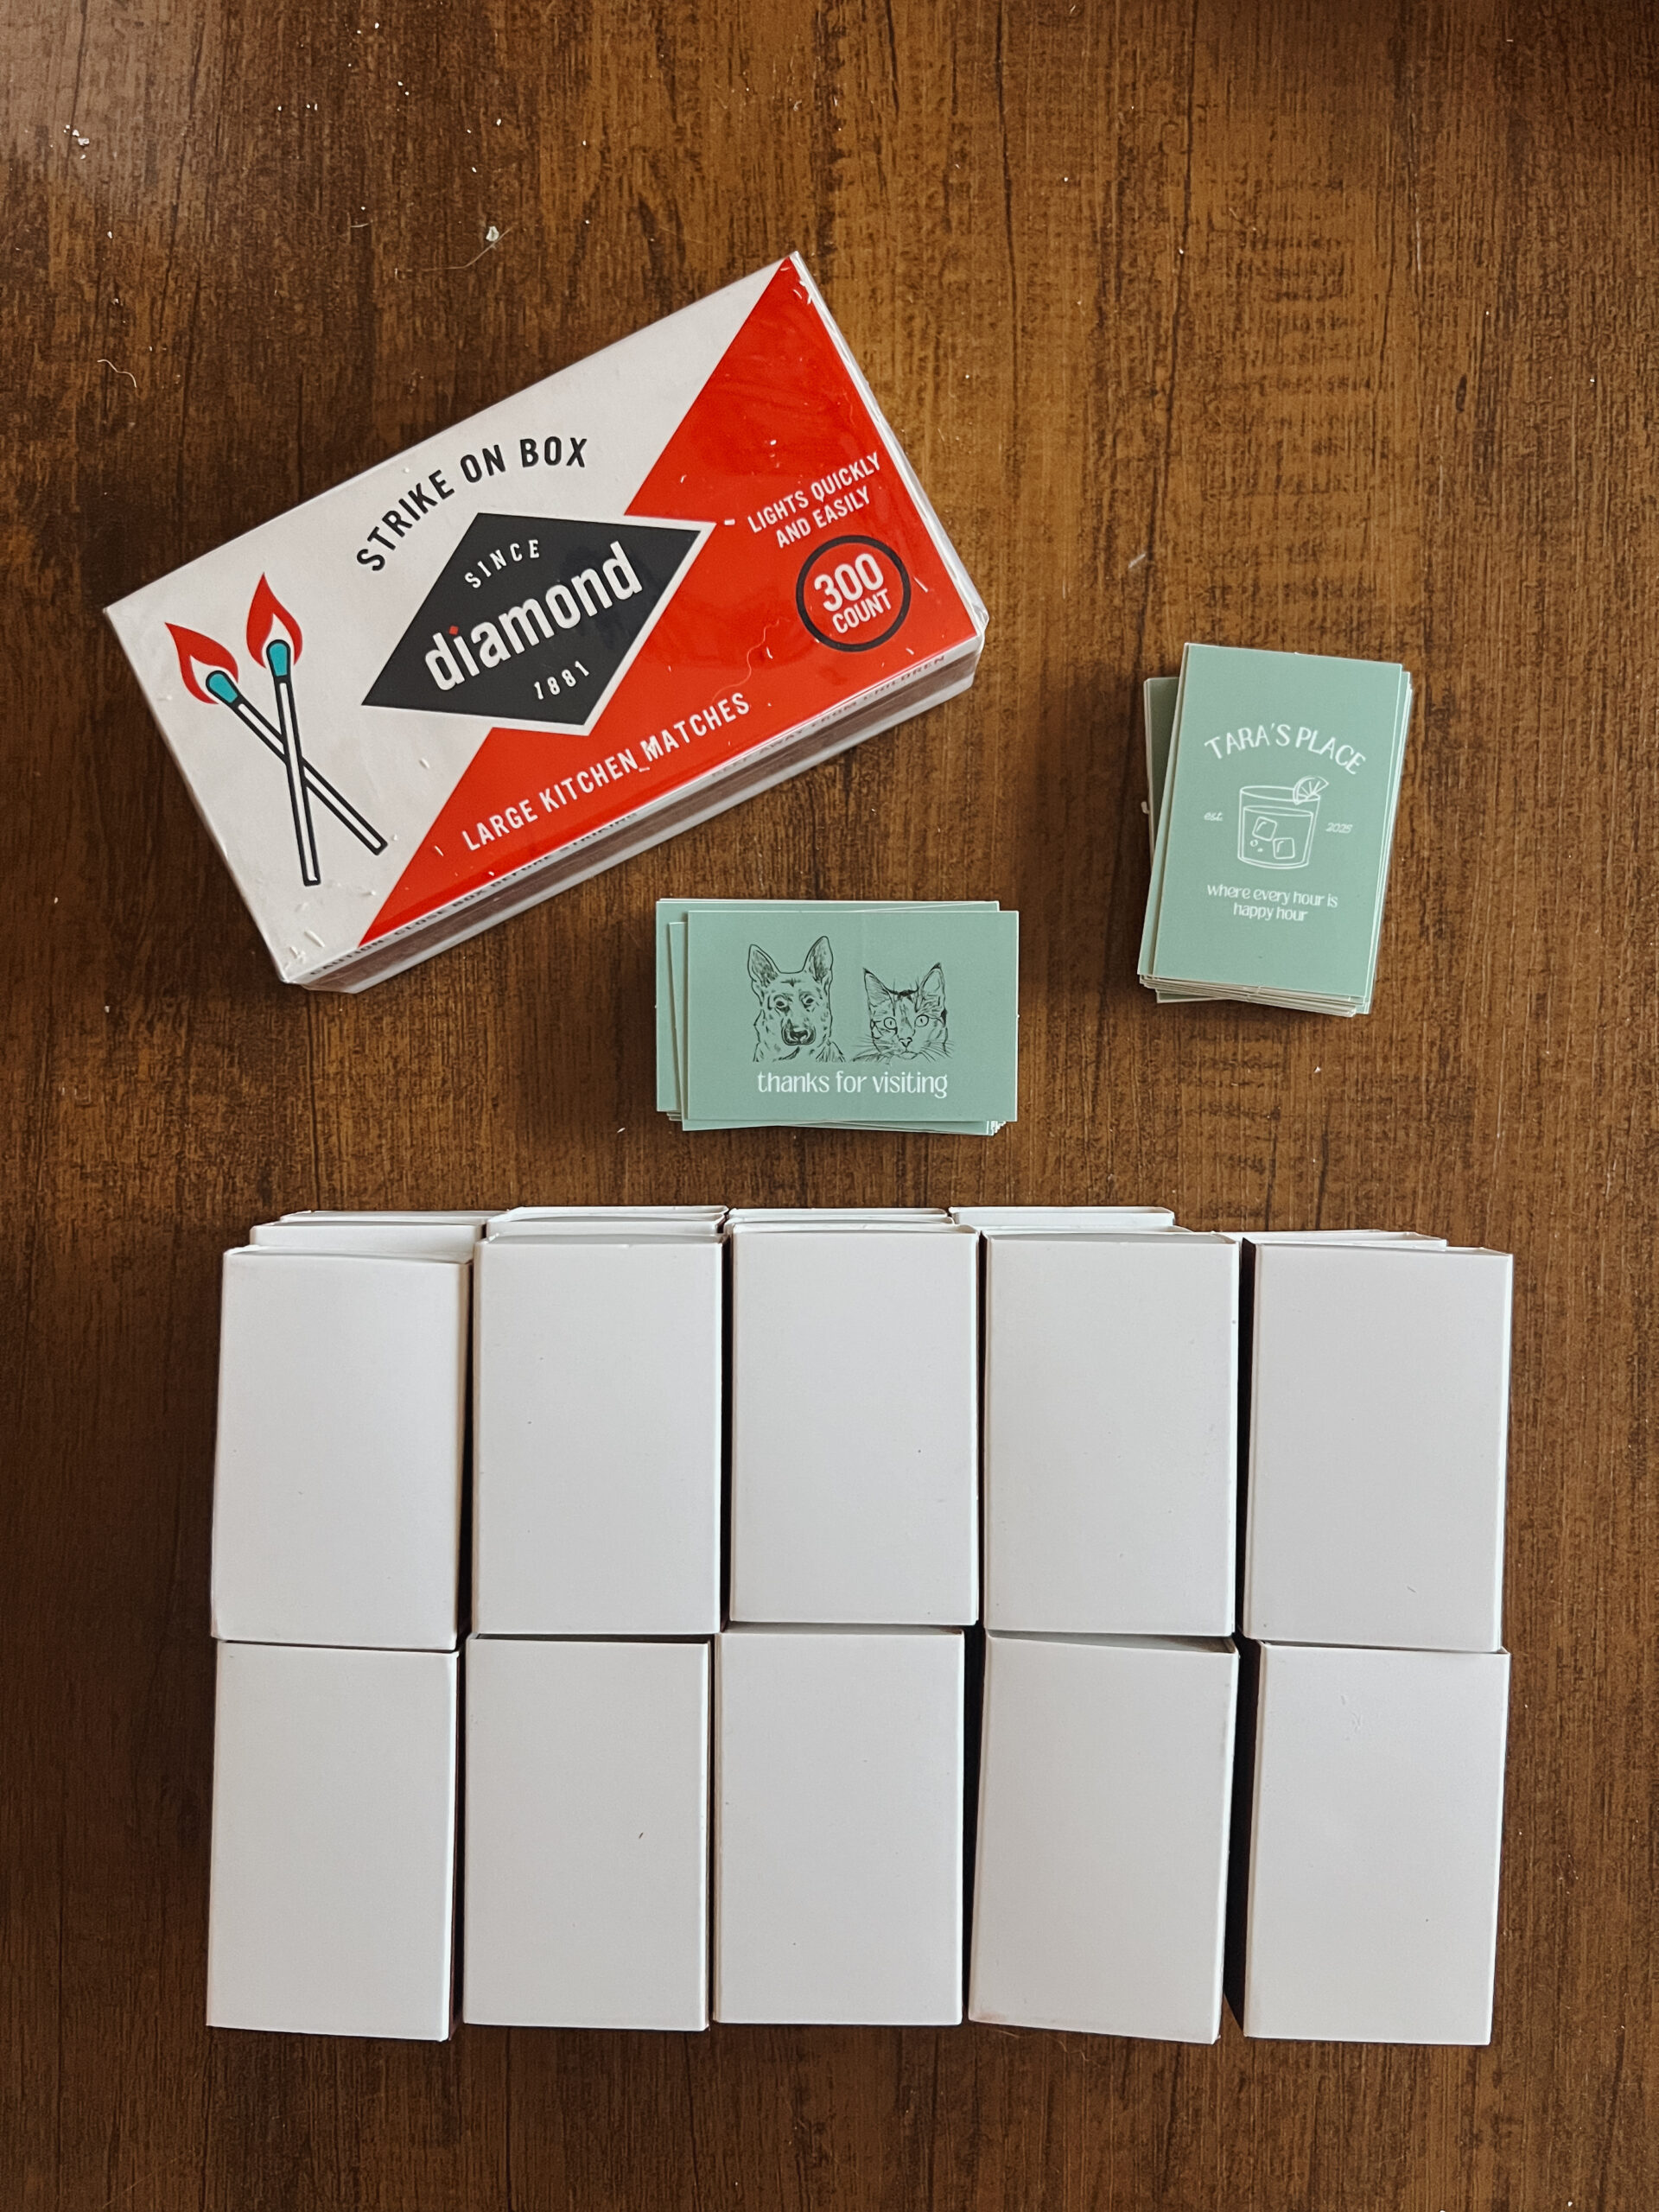
Here’s why: I ordered empty matchboxes from Amazon and then picked up standard kitchen matches from the grocery store to fill them only to discover that the kitchen matches were too long to fit inside the boxes. That meant I had to individually cut every single match down to size. For 50 matchboxes. By hand. With scissors.
It was fine, honestly kind of meditative, but it was absolutely not necessary. Matchbooks come pre-filled with matches and only require one sticker on the outside rather than two (one for each side of a matchbox). Less cost, less assembly time, and a cleaner finished look.
The only reason I went the matchbox route was timing as the matchbook suppliers couldn’t get them to me in time for the party. But if you have a few extra days and are ok with a different look, go with matchbooks!
Step 1: Design Your Stickers in Canva
The design is the fun part and honestly where all the personality lives! I created two custom sticker designs in Canva, one for each side of the matchbox:
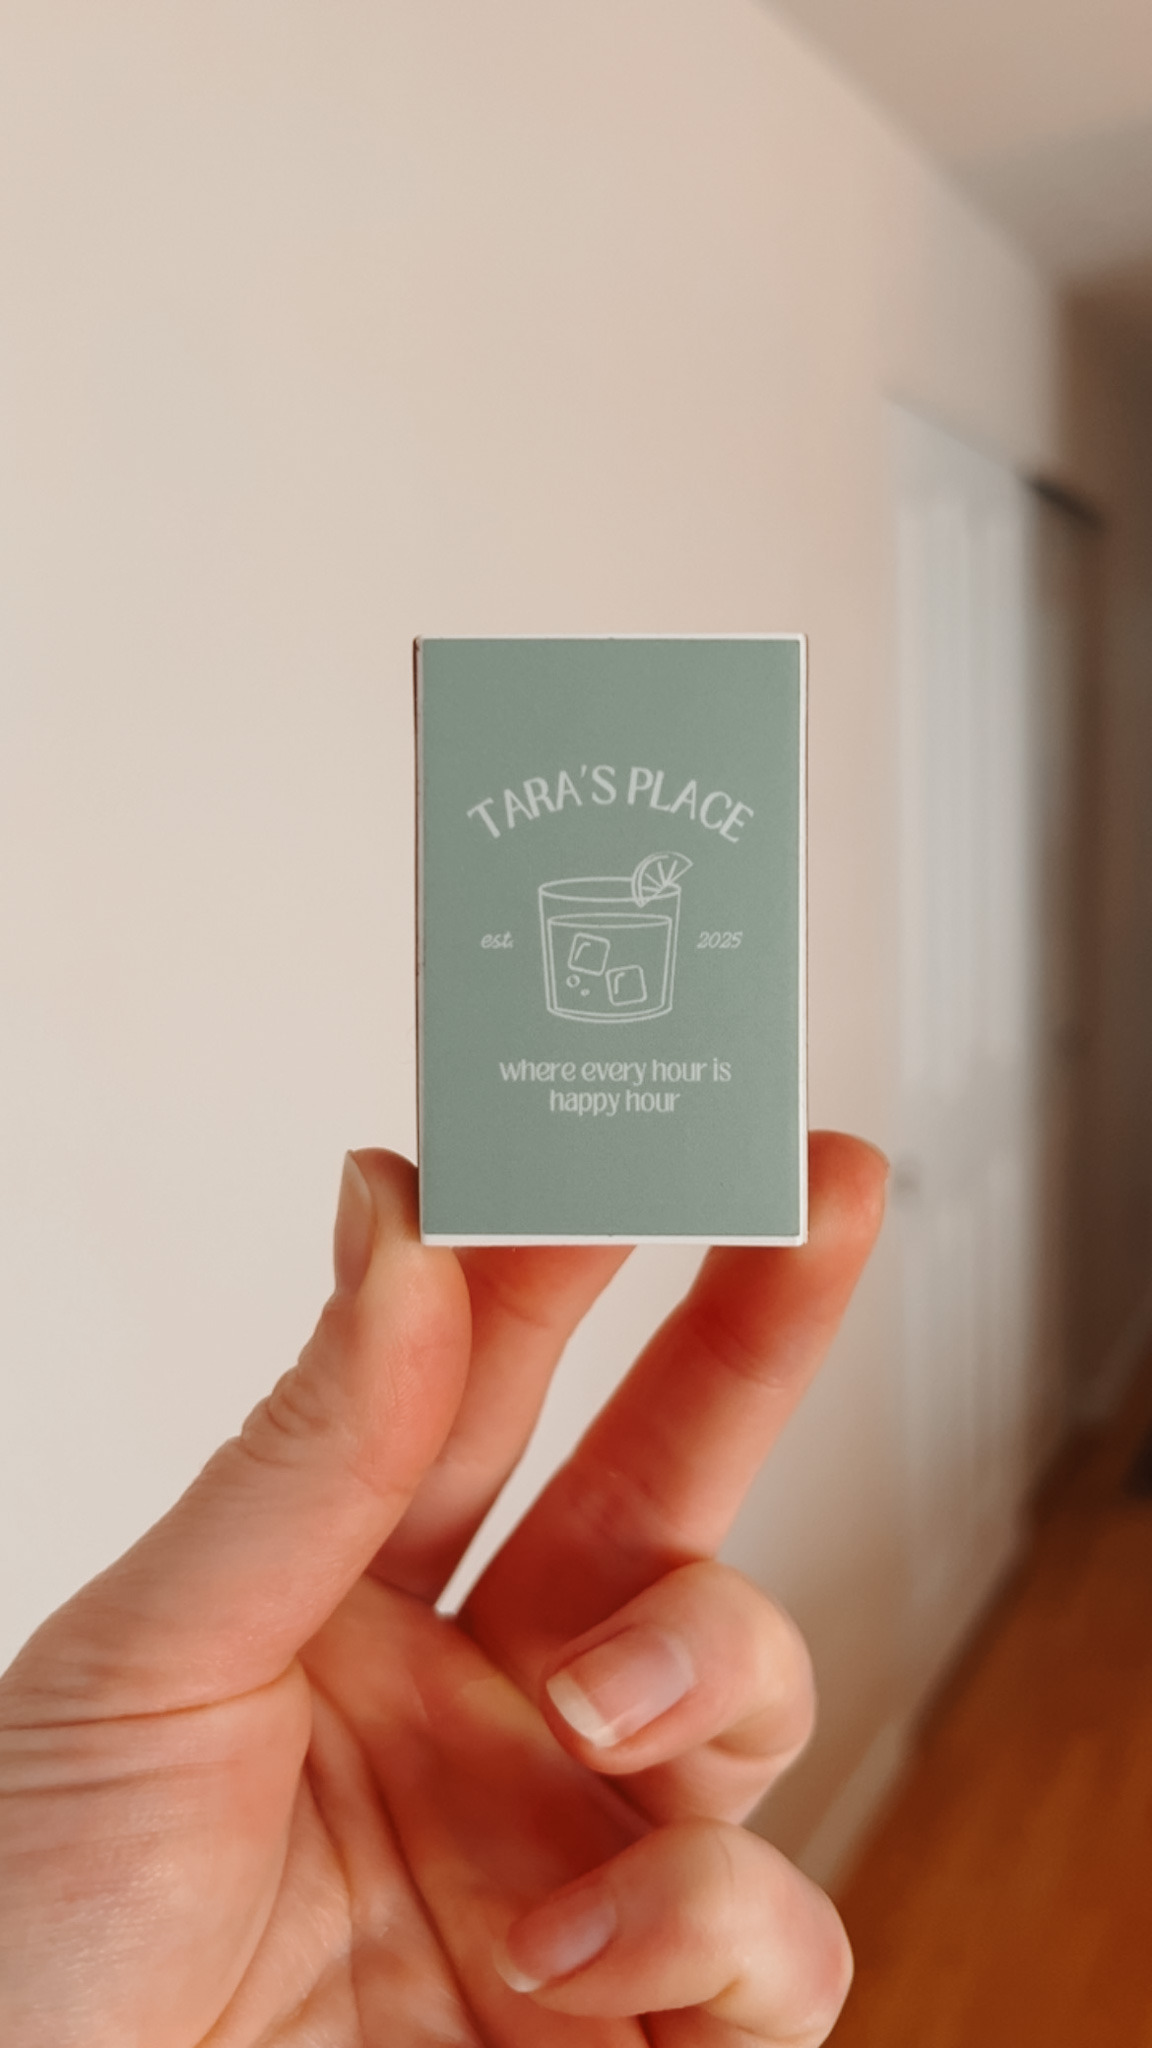
Front sticker: I found some inspo from a website that sold custom matchboxes (for way too much). I used the name “Tara’s Place” at the top, added a small cocktail illustration in the center, the phrase “where every hour is happy hour” underneath, and “est. 2025” on either side of the illustration since this was the year I moved in.

Back sticker: This one was my favorite. I added line drawings of a cat and a dog that look similar to my two pets, and wrote “thanks for visiting” underneath. It was a small personal touch that every single guest commented on.

Sizing tip: My matchboxes measured 2.24″ x 1.42″ so I designed my stickers at 2.2″ x 1.4″ just slightly smaller than the actual box face. This gives a clean, intentional look without the sticker hanging over the edges.
Step 2: Order Your Custom Stickers
Once your designs are ready in Canva, export them as high-resolution PNG files and head to MakeStickers.com to place your order.
I chose MakeStickers specifically because they were quick! Most custom sticker sites were quoting me multiple weeks for delivery or charging a fortune for expedited shipping. MakeStickers got mine to me within 5 days at a totally reasonable price point, and the quality was excellent. I ordered mine in a matte finish which gave them a clean, premium look.

Bonus tip: If you own a Cricut machine, you can make these for practically nothing! I don’t own one yet, but after this project I’m seriously considering investing in one for future DIYs like this.
Step 3: Assemble Your Matchboxes
This step is where the process differs depending on whether you went with matchboxes or matchbooks:
If you used matchbooks: Simply apply your single sticker to the front cover of each matchbook. Done. Seriously, that’s it.
If you used matchboxes like I did:
- Fill each empty box with matches- if your kitchen matches are too long, trim them down with heavy-duty scissors to fit the box length
- Apply your front sticker to one side of the box
- Apply your back sticker to the other side
- Press both stickers down firmly, smoothing out any air bubbles from the center outward
Repeat 50 times, put on a good playlist, and pour yourself something fun to drink!

Step 4: Display and Gift
I kept mine simple and arranged them in a shallow bowl on my entryway table so guests could grab one on their way out. Except most people spotted them on the way in and were already holding one before they even had their first drink, which honestly made me so happy!
You could also:
- Tie them with twine and a small tag for a more gift-like presentation
- Display them in a small basket next to your candles or fireplace
- Package sets of two or three together with a ribbon for a more substantial favor

The Full Cost Breakdown
| Item | Cost |
|---|---|
| Empty matchboxes (Amazon) | ~$15 |
| Kitchen matches (grocery store) | ~$5 |
| Custom stickers (MakeStickers.com) | ~$40 |
| Total for 50 matchboxes | ~$60 |
That works out to $1.20 per matchbox for a completely personalized, handmade party favor that guests actually want to keep and use!
Final Thoughts
If you’re planning a housewarming and want a favor that feels intentional and personal without breaking the bank, custom matchboxes are the move. They’re inexpensive, quick to assemble, completely customizable, and based on my guests’ reactions, they’re genuinely memorable. The personal details are what make them special. Think about what makes your home, your life, and your personality unique and let that drive your design. Custom matchbox party favors are the kind of detail guests remember long after the party is over.
Tag me on Instagram @tarahillhome if you make these for your party. I’d love to see your designs!